How To Make A Gif
The power of the .gif stretches further than just a viral meme.
Personally, I use .gifs to explain everything. Seriously, I feel like half my job as a web designer is just explaining things to clients and one of my favorite ways to explain is by creating custom .gifs. Obviously, I like to use them in my blog posts as well 👇
Here's how I make a .gif using Adobe Photoshop:
- In Photoshop, let's first create our project by going to ⇢ File ⇢ Scripts ⇢ Load Files Into Stack ..
Load the files you want to use by clicking on the Browse button from the menu that pops up followed by clicking OK.
- Open your Timeline View by going to Window ⇢ Timeline
We will use the Timeline to help us build our .gif. This is helpful, and necessary, because we can preview and make adjustments to time our .gif just right.
- Now that the Timeline is open, click on the button that says Create Frame Animation.
If you don't see the Create Frame Animation button then you probably will see the Create Video Timeline button instead. No worries, just click on the down arrow right next to it to select Create Frame Animation.
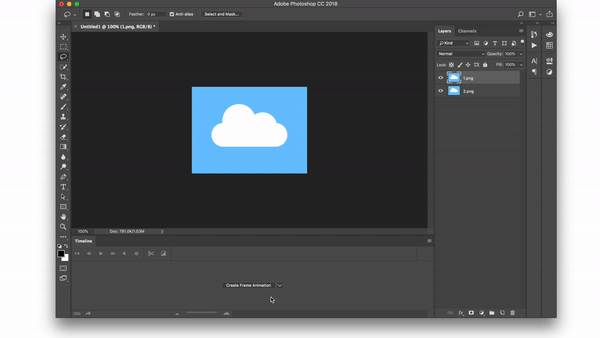
There is actually a lot of grief posted on the web these days about how the Create Frame Animation button doesn't actually look like a button at all. Honestly, I forget that you actually have to click on that button all the time! I blame the UI designers at Adobe for that one! #YouHadOneJob
- Select all of the layers by going to Select ⇢ All Layers
Alternatively, you can click on one layer and hold down the command key ⌘ to select the other layers you'd like to use. Holding down the option key + command key + A (⌥ ⌘ A) also selects all layers for you.
- Add the layers to the Timeline window by clicking ☰ ⇢ Make Frames From Layers
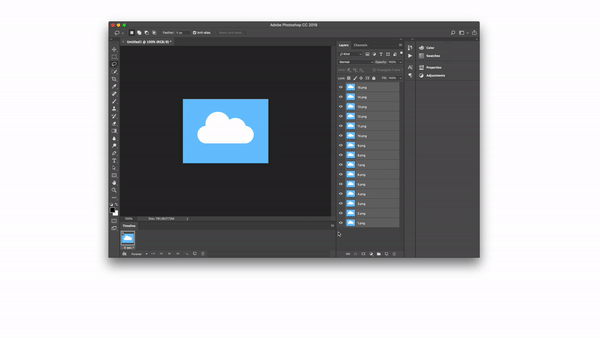
The ☰, or commonly referred to as the hamburger icon, can be found to the far right side of the Timeline window. Now you can reorder your frames, adjust the time each frame is shown and even choose how we want our gif to play (Once, 3 Times or Forever) directly in the Timeline window.
Hint: Select all of the frames to change all settings at once by clicking the first frame then hold down the shift key ⇧ and select the last frame.
- Save your .gif by going to File ⇢ Export ⇢ Save For Legacy
A window will pop up that gives more options on how to save your .gif. Make any changes you'd like then go ahead and lick OK to bring up another window that will allow you to name the file and finish saving it.
That's it! Pretty helpful little process that makes explain life so much easier